Introduction to Qualys
Six phases of the Vulnerability Management lifecycle:
- Discover: six phases of the Vulnerability Management lifecycle
- Organize Assets: Asset groups and asset tags helps us to manage the resources. Qualys provides different means for managing the different discovered resources.
- Assess: the main reason for this step is to do an analysis of the discovered resources for vulnarabilities, threats etc. The information a six phases of the Vulnerability Management lifecycle
- Report: six phases of the Vulnerability Management lifecycle
- Remediate: The remediation tools built into the vulnarability managemnet application willl help us prioritize detected vulnarability and also identify which of these have been mitigated.
- Verify: Verifies if the vulnaribility has been patched or not.
Scanning
We can use scanners from Qualys Cloud Platform to scan for vulnerabilities.
External Scanner Pool :can be used to scan the resources which are open to world and public/internet facing. The Firewall is configured such that the external scanner has complete permissions to make the scans through the firewall. By default, any user with scanning privileges has access to the external scanning pools.
Internal Scanner : These are commonly used to scan items inside a private network or lan or any other internal resource without having issues from firewalls.
Qualys Agent
All the resources will have qualys agents installed which will access the metadata of those resources and send to Qualys cloud platform for assessment. The assesment is never done by the agent. Agents are ideal for resources which are difficult to scan and generally used for Cloud Based resources.
Supported OS: Windows, Mac OS X, IBM AIX, LINUX debian and ubuntu, Linux redhat, centos, fedora, OpenSUSE, Amazon linux, Oracle Enterprise Linux
- To scan hosts, we would need to add those hosts on our Assets. To do this, Go to Host Assests->new
- Tracking methods: Defines how hosts will be tracked, like IP Tracketd Hosts, DNS tracked Hosts, NetBIOS Tracked Hosts
- Qualys HostID is unique to each Host (resource to be scanned) and this can then be used for agentless tracking
- External internet based Scanner: scanner appliance (by default) available to all Qualys users with “scanning” privileges
Qualys KnowledgeBase
Edited: A knowledge base can only be edited by a manager user role
Remote Discovery: the vulnerability can be detected remotely by qualys scanner appliance and does not need authentication
Authenticated Discovery: Authentication is needed for successfull scanning in this case
Patch: Patch is available and also gives direct links to the available patch
Exploit available: Identifies exploits that are associated to this vulnerability
Associated Malware: Explains malwares associated to this vulnerability
Not Explo due to.. : This means the vulnerability can be avoided using certain configurations on the host
Non-running services: Means the vulnerabilities associated to the services which is exploitable but are not running
Color Coding Vulnerabilities
Confirmed Vulnerability: this means an active test is present to confirm the vulnerability
Potential Vulnerability: No active test avilable to confirm this vulnerability, hence need manual investigation for confirmation
Information Gathered : Consists of config settings, related information about configurations
Half Red/Half yellow: these types of vul has 2 very predictable scan results depending upon the authentication types
Types of Scan Results
- Untrusted Scan results: IN this case the color code is yellow since qualys did not had authentication to verify vulnerability but that vulnerablity was detected
- Trusted Scan results: A vulnerability was detected and qulays had authentication to verify the vulnerability. A QID or report can first be yellow and after it is authetnicated, it might change to red if that vulnerability was confirmed. This means the scan was run in authenticated mode due to which it was able to verify the vul
Severity levels
5: Most severe. Might give root access to host
3 & 4 : Might give access to host
1 & 2: Indicates vul that might lead to leakage of secret info /PII. 1 is least.
5,4 & 3 should be catered to first asap.
CVSS Score: Common Vulnerability Scoring System: This is the default for payment card industry data security standards
Using QID Search
We can use Search option given to find QIDs (findings) and apply multiple filters for the same such as severity level, Scan type etc.
- We can disable a vul from the “Edit Vulnerability” window but those vuls are still detected and presented in the raw scan results but not in general report
- We can also select the agents to be scanned:
Search Lists
We can create our own QIDs using Vulnerability search list. This list, when run will give us vuls according to the settings we configure for this search list. So we can create a search list maybe only for vul 3-4 and that would include only reports/QIDs with those matching criteria
Types:
-
Dynamic Search List: For a dynamic list, we need to specify a ‘List Criteria’ using different filters from the menu:
The list criterias selected will decide which new QIDs being generated must be included in this list. We can use the ‘Test’ button which will show us all the current QIDs that will be listed in this list.
-
Static List: This is used in case the QIDs that we want in the list does not have a common criteria and so filter would not work. In such cases use static list. We can choose select option to show us all the QIDs currently detected/created and then manually add each QID in this list by selecting those. We can also select ‘manual’ option in which we have to paste QIDs separated by Commas to create a static list of those specific reports/QIDs
Search List Uses
We can use the above created search lists for scanning, reporting and remediation. Ex: We can use dynamic search list to get a list of all the QIDs which are sev 5 and have no patch using filters.
Remediation List : This can be used to send a particular search list to a particular user for example send a list to the specific team which is responsible for fixing n working on those QIDs. A special purpose user called ‘remediation user’ is provided just for this.
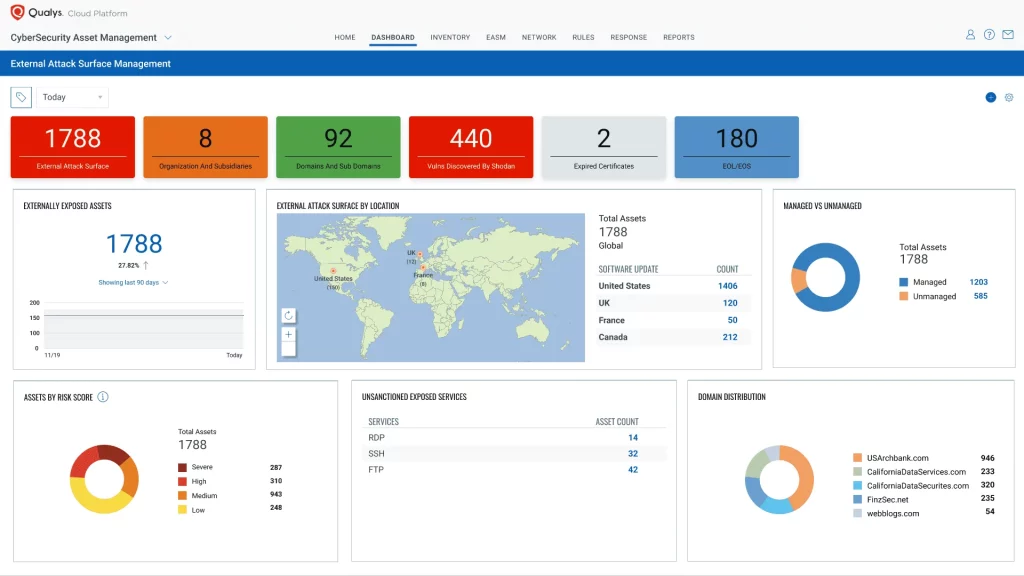
Assets And Assets Inventory
Vulnerability Management and AssestView both are used for viewing assets. Both provide asset details, Asset Search and Assets grouping/tagging features.
- Vulnerability Mangement System:
Host Assets: Contains all the hosts being scanned, their current OS and some more info
Applications: Shows all the apps installed on these hosts
Asset Search: We can build our own query and then run against our hosts to show us results of the hosts which meet those filters, such as all hosts in ProdEng which are not scanned in past 3 months, maybe with Linux.
Asset Groups: Assest groups can be based on Geographic boundaries, Network Boundaries, Device types, Operating Systems, System Priority or criticality, asset ownership or any other type of physicaly or logical grouping of assets which defines a host asset
- The scans must be made in authenticated mode to provide us the installed software results
- AssetView:
This contains information of all the assets under qualys scope
Upon making a right click on any of the above mentioned assets, we can navigate to “View Asset Details” which will show us the major info about that asset such as open ports, installed software, Vulnerabilities, compliance, file integrity monitoring etc. Refer below pic:
Using Queries: We can create our own queries and also make widget out of those queries. We can also save our queries. The qualys provides docs on how to create these queries with various diff examples.
You can select different types of widgets such as :
- Count
- tables
- Bars
- Pie
Asset Tags
Asset Tags provide a mechanism for grouping and organising. There is a proper tagging hierarchy which is used. So like OS will be parent tag and Linux/Windows would be the child tags:
We can further create ‘Tag Rule’ which will allow the tags to automatically change/update once an asset match that tag rule and the rule works on it.
Asset Groups
4 Uses of Asset groups are:
- Scanning particular targets based on the group they are in.
- View only those resources/assets that a particular group has interest in and not all the assets
- If a group asset has same remediation, we can directly deploy that remediation on that asset group
- Manage which users can access which asset group
- Asset groups for Scanning targets
We can delegate Domain names to the asset groups. Using this, will allow us to delegate mapping responsibilities to the qualys user accounts
We can further choose multiple scanner appliances for the assets group if we want.
It is beneficial to configure the Business Impact of an Asset Group, since It’s used to calculate Business Risk.
- Using Asset Groups to scan by Host Name
- Scanner appliance must resolve hostname to IP address
- Only hostname IPs in your subscription will be scanned
Asset Tags
- this should be enabled in our account first to start using asset tagging. Check the same in account settings, if not enabled, then enable it.
Asset Tags Vs Asset groups:
- Tags helps in automation
- Tags support nesting
- Tags are dynamically updates
- Groups identify the ‘business impact’ of host assets
Using Asset Tags
1. Scanning resources based on tags
- We can launch scans based on tags.
- Using Operators : We can select multiple tags such as location: San Jose and OS: Windows, and then chose a operator of our choice to act on these tags. So we can choose operator as ‘All’ and in this case if resource have either of the tags, it will be scanned. We can also chose operator such that only resources with all the tags present are scanned.
** here ‘ANY’ operator = logical ‘OR’ , also ‘ALL’ = AND
- We can select tags in ‘Do not include….. ” list to exclude the resources which are having that tag, such as ‘inactive’
- Using ‘temporarily add agent addresses not …. subscription’ will appear if you install qulays Cloud agents on hosts and allows us to scan these assets .
Vulnerability Assessment
Scanners and Agents
Qualys Vm scanning Engine
Data Collection Modules
- Service Detection Module
- OS detection Module
- Vulnerability Assessment and Detection
Scan Configuration Components
The diagram above basically explains that there are 3 components to scanning:
- Option profile: Here we basically decide weather the scan is authenticated or unauthenticated. Authentication is linked to Auth Records.
- Scanner Appliance: You’ll get different scanner appliance to chose from
- Target hosts Assets: Here we’ll chose which assets to scan depending upon their Asset group or tag, or we can just mentioned a particular IP range which is basically the ‘NetBlocks’ option
When scanning, if the Host Asset shows ‘AGENT’, it means that host has Agent deployed. Hosts having qualys agents are very easy to scan:
Scanner Appliances
Below are the scanner appliances different types:
- Default
- External: these are external scanners which scans infra from outside
- We can create internal scanners and name is as we wish. These would be scanners inside a Intranet network and will not use external scanner since these assets might not be public/internet facing
Viewing Scan Results
- We can view the scan result in the ‘scan’ page
- Scan results are also called ‘scan based findings’
- The number of these scans/findings depend upon your settings in the ‘Storage’ menu
- Bydefault, findings are stored for 6 months. Can be adjusted from 1-13 months.
- These settings in ‘Storage’ only impact scan based findings and does not impact host based findings
- The results section in the finding shows the information collected from the host that produced that vulnerability finding
- Option Profile: This is where we create the profiles and enter the credentials for authenticated scans depending upon the host. Finally when we are to create a scan, we select that option profile so that authenticated scans can be run with the expected credentials. please do create option profile from the dashboard to use that profile while scanning.
Scheduling Vul Scans
- We can run scans based on the schedule
- Agent Data Collection interval: This is scheduled scans for cloud. It can range from 24hrs to 30days
Reporting Overview
Scan report: Helps analyse vulnerability findings and assessment made by the qualys cloud agent. We can further use the scan report templates to display the data as per the vulnerability
Scorecard Report: This shows high level view of the scan results with summary, statics and matrics
Map report: This is a good tool to discover new host assets and helps with creation of asset groups
Patch reports: Similar to scan report since it provide info about the detected vul but focuses on the patches that can be used to fix and mitigate the vul. It makes it easy to understand what all resources are affected by this patch. But should be used in authenticated mode.
Remediation reports: This helps us the find team responsible for mitigation or patch and further fhelps to access performs.
Compliance Reports: Produces PCI assets and techincal reports
Asset Search report: Extension of VMs Asset Search, results of search queries can be saved to popular files formats. Accuracy of this result is better after running the assesment/scans first.
Report Configuration Components
Reports which do not require templates:
- authentication reports
- assets search reports
- scorecard reports
All reports requires to select a source of the report. Could be IP blocks, Asset Group and Asset Tags.
Scans does not equal to reports, so scans must be run before report is run.
Report Template
- Scan Based findings comprises of all the individual vulnerability findings where each scan tells unique inferences depending upon the timeline.
- These reports are called snapshot reports since they are not affected by previous or future scans.
- All these scan based findings comes together inside a host based findings.
- Host based scan collect data from these findings
- Host based findings gives timeline of all the vulnerabilities for a particular host
- Unlike scan based findings, in host based findings, we can create vul trend reports and then track the progress : new, active, fixed and reopened.
We can select reports to have EC2 metadata also.
User Privileges
- A user’s role defines what kind of permissions it will enjoy
-
Following are the user role’s and their priviledges:
- higher level roles will have complete permissions of the roles below them
- Some Other roles such as Auditor, Contact, Uder Administrator and KnowledgeBase Only are also available:
- Asset Groups: This basically designates which asset group the user will have access to.
Business Units
- It provides easy way to divide tasks between users across complete org
- We can further add assets groups to BUs so that only particular BU has access to a particular asset group
- Similar users can be added to the BUs
- BU manager helps to maintain these ie handle admin needs> it manages assets and units and maintain security settings
Remediation
- 2 components of remediation policy: 1. Actions 2. conditions
- The policy at top has the highest priority and we can change this priority too